If you want to simply test the system and quickly get going, please see the Quickstart section.
Customize preexisting VM's
A simple way to get an installation going is to clone and customize Martin's repos for your installation. These consist of three repos that are needed to set up the Archiver Appliance environment. Simply follow the rules in the README of the first repo and the other two repos will be pulled in automatically. The Puppet manifests are found in puppet_module_archiver_appliance.Site specific installs
Han maintains a set of scripts for site specific installs. This is an excellent starting off point for folks who wish to build their own deployment bundles. This is tested against Debian/CentOS; but should be easily extensible for other distributions.Using an install script
If you plan to have only one machine in the cluster, you can consider using theinstall_scripts/single_machine_install.sh install script that comes with the installation bundle.
This install script accommodates installations with a "standard" set of parameters and installs the EPICS archiver appliance on one machine.
In addition to the System requirements, the install_scripts/single_machine_install.sh will ask for
- Location of the Tomcat distribution.
- Location of the MySQL client jar - usually a file with a name like
mysql-connector-java-5.1.21-bin.jar - A MySQL connection string that looks like so
--user=archappl --password=archappl --database=archapplthat can be used with the MySQL client like somysql ${MYSQL_CONNECTION_STRING} -e "SHOW DATABASES". This implies that the MySQL schema has already been created using something likemysql --user=root --password=***** CREATE DATABASE archappl; GRANT ALL ON archappl.* TO 'archappl' identified by 'archappl';
install_scripts/single_machine_install.sh install script creates a couple of scripts in the deployment folder that can be customized for your site.
sampleStartup.sh- This is a script in the fashion of scripts in/etc/init.dthat can be used to start and stop the four Tomcat processes of your archiver appliance.deployRelease.sh- This can be used to upgrade your installation to a new release of the EPICS archiver appliance. ThedeployRelease.shalso includes some post install hooks to deploy your site specific content as outlined here.
Details
For a finer control over your installation, installation and configuration consists of these steps. For the cluster- Create an appliances.xml
- Optionally, create your policies.py file
- Install and configure Tomcat
- Compile the Apache Commons Daemon that is supplied with Tomcat.
- Install MySQL (or other persistence provider)
- Create the tables
- Create a connection pool in Tomcat
- Set up storage
- Create individual Tomcats for each of the WAR files using the provided python script that copies a single Tomcat installation into four individual Tomcats - one for each WAR.
- Deploy the WAR files into their respective containers - This is the deployment step that will be run when you upgrade to a new release.
- Stop/Start each of the Tomcats
Create an appliances.xml
The appliances.xml is a file that lists all the appliances in a cluster of archiver appliance.
While it is not necessary to point to the same physical file, the contents are expected to be identical across all appliances in the cluster.
The details of the file are outlined in the ConfigService javadoc.
A sample appliances.xml with two appliances looks like
<appliances>
   <appliance>
     <identity>appliance0</identity>
     <cluster_inetport>archappl0.slac.stanford.edu:16670</cluster_inetport>
     <mgmt_url>http://archappl0.slac.stanford.edu:17665/mgmt/bpl</mgmt_url>
     <engine_url>http://archappl0.slac.stanford.edu:17666/engine/bpl</engine_url>
     <etl_url>http://archappl0.slac.stanford.edu:17667/etl/bpl</etl_url>
     <retrieval_url>http://archappl0.slac.stanford.edu:17668/retrieval/bpl</retrieval_url>
     <data_retrieval_url>http://archproxy.slac.stanford.edu/archiver/retrieval</data_retrieval_url>
   </appliance>
   <appliance>
     <identity>appliance1</identity>
     <cluster_inetport>archappl1.slac.stanford.edu:16670</cluster_inetport>
     <mgmt_url>http://archappl1.slac.stanford.edu:17665/mgmt/bpl</mgmt_url>
     <engine_url>http://archappl1.slac.stanford.edu:17666/engine/bpl</engine_url>
     <etl_url>http://archappl1.slac.stanford.edu:17667/etl/bpl</etl_url>
     <retrieval_url>http://archappl1.slac.stanford.edu:17668/retrieval/bpl</retrieval_url>
     <data_retrieval_url>http://archproxy.slac.stanford.edu/archiver/retrieval</data_retrieval_url>
   </appliance>
</appliances>- The archiver appliance looks at the environment variable
ARCHAPPL_APPLIANCESfor the location of theappliances.xmlfile. Use an export statement like so
to set the location of theexport ARCHAPPL_APPLIANCES=/nfs/epics/archiver/production_appliances.xmlappliances.xmlfile. -
The
appliances.xmlhas one<appliance>section per appliance. You can have more entries than you have appliances; that is, if you plan to eventually deploy a cluster of 10 machines but only have a budget for 2, you can go ahead and add entries for the other machines. The cluster should start up even if one or more appliances are missing. -
The
identityfor each appliance is unique to each appliance. For example, the stringappliance0serves to uniquely identify the archiver appliance on the machinearchappl0.slac.stanford.edu. - The
cluster_inetportis theTCPIP address:portcombination that is used for inter-appliance communication. There is a check made to ensure that the hostname portion of thecluster_inetportis eitherlocalhostor the same as that obtained from a call toInetAddress.getLocalHost().getCanonicalHostName()which typically returns the fully qualified domain name (FQDN). The intent here is to prevent multiple appliances starting up with the same appliance identity (a situation that could potentially lead to data loss).- For a cluster to function correctly, any member
Aof a cluster should be able to communicate with any memberBof a cluster usingB'scluster_inetportas defined in theappliances.xml. - Obviously,
localhostshould be used for thecluster_inetportonly if you have a cluster with only one appliance. Even in this case, it's probably more future-proof to use the FQDN.
- For a cluster to function correctly, any member
-
For the ports, it is convenient if
- The port specified in the
cluster_inetportis the same on all machines. This is the port on which the appliances talk to each other. - The
mgmt_urlhas the smallest port number amongst all the web apps. - The port numbers for the other three web apps increment in the order show above.
- The port specified in the
-
There are two URL's for the
retrievalwebapp.- The
retrieval_urlis the URL used by themgmtwebapp to talk to theretrievalwebapp. - The
data_retrieval_urlis used by archive data retrieval clients to talk to the cluster. In this case, we are pointing all clients to a single load-balancer onarchproxy.slac.stanford.eduon port 80. One can use the mod_proxy_balancer of Apache to load-balance among any of the appliances in the cluster.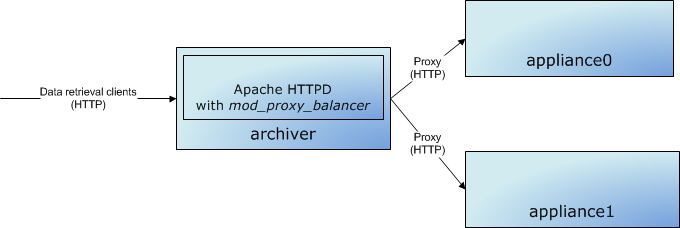
Using Apache HTTP on archiverto load balance data retrieval betweenappliance0andappliance1.- Note there are also other load-balancing solutions available that load-balance the HTTP protocol that may be more appropriate for your installation.
- Also, note that Apache+Tomcat can also use a binary protocol called
AJPfor load-balancing between Apache and Tomcat. For this software, we should use simple HTTP; this workflow does not entail the additional complexity of theAJPprotocol.
- The
Create your policies file
The EPICS archiver appliance ships with a samplepolicies.py (from the tests site) that creates a three stage storage environment. These are
- STS - A datastore that uses the PlainPBStoragePlugin to store data in a folder specified by the environment variable
ARCHAPPL_SHORT_TERM_FOLDERat the granularity of an hour. - MTS - A datastore that uses the PlainPBStoragePlugin to store data in a folder specified by the environment variable
ARCHAPPL_MEDIUM_TERM_FOLDERat the granularity of a day. - LTS - A datastore that uses the PlainPBStoragePlugin to store data in a folder specified by the environment variable
ARCHAPPL_LONG_TERM_FOLDERat the granularity of an year.
policies.py file, you can use the ARCHAPPL_POLICIES environment variable, like so.
export ARCHAPPL_POLICIES=/nfs/epics/archiver/production_policies.py
On the other hand, if you are using a site specific build, you can bundle your site-specific policies.py as part of the mgmt WAR during the site specific build.
Just add your policies.py to the source code repository under src/sitespecific/YOUR_SITE/classpathfiles and build the war by setting the ARCHAPPL_SITEID during the build using something like export ARCHAPPL_SITEID=YOUR_SITE.
In this case, you do not need to specify the ARCHAPPL_POLICIES environment variable.
Installing Tomcat and setting up Apache Commons Daemon
Installing Tomcat consists of- Untar'ing the Tomcat distribution. It is best to set the environment variable
TOMCAT_HOMEto the location where the Tomcat distribution is expanded. Many of the following steps require aTOMCAT_HOMEto be set. - Editing the
conf/server.xmlfile to change the ports to better suit your installation.- By default, the connector port for the HTTP connector is set to 8080.
Change this to the port used by the
mgmtwebapp for this appliance, in this example, 17665.<Connector connectionTimeout="20000" port="808017665" protocol="HTTP/1.1" redirectPort="8443"/> - Remove/comment out the sections for the AJP connector.
-
At the end, there should be two ports active in the
conf/server.xmlfile, one for the HTTP connector and the other for theSHUTDOWNcommand.
- By default, the connector port for the HTTP connector is set to 8080.
Change this to the port used by the
- Setting the appropriate log4j configuration level by creating/editing the
lib/log4j.properties. Here's a sample that logs exceptions and errors with one exception - log messages logged to theconfignamespace are logged at INFO level.# Set root logger level and its only appender to A1. log4j.rootLogger=ERROR, A1 log4j.logger.config.org.epics.archiverappliance=INFO log4j.logger.org.apache.http=ERROR # A1 is set to be a DailyRollingFileAppender log4j.appender.A1=org.apache.log4j.DailyRollingFileAppender log4j.appender.A1.File=arch.log log4j.appender.A1.DatePattern='.'yyyy-MM-dd # A1 uses PatternLayout. log4j.appender.A1.layout=org.apache.log4j.PatternLayout log4j.appender.A1.layout.ConversionPattern=%-4r [%t] %-5p %c %x - %m%n - To use Apache Commons Daemon, unzip the
${TOMCAT_HOME}/bin/commons-daemon-native.tar.gzand follow the instructions. Once you have built this, copy thejsvcbinary to the Tomcatbinfolder for convenience. Note, it's not required that you useApache Commons Daemonespecially, if you are already using system monitoring and management tools like Nagios or Hyperic.[ bin ]$ tar zxf commons-daemon-native.tar.gz [ bin ]$ cd commons-daemon-1.1.0-native-src [ commons-daemon-1.1.0-native-src ]$ cd unix/ [ unix ]$ ./configure *** Current host *** checking build system type... x86_64-pc-linux-gnu ... [ unix ]$ make (cd native; make all) ... [ unix ]$ cp jsvc ../../../bin/
Installing MySQL
The version of MySQL that is available from your distribution is acceptable; though this is completely untuned. Please look at the more than excellent chapters on MySQL optimization at the MySQL web site to tune your MySQL instance. In addition to various parameters, even something as simple as settinginnodb_flush_log_at_trx_commit=0 (assuming you are ok with this) will go a long way in improving performace (especially when importing channel archiver configuration files etc).
Each appliance has its own installation of MySQL. In each appliance,
-
Make sure MySQL is set to start on powerup (using
chkconfig) - Create a schema for the archiver appliance called
archappland grant a user (in this example, also calledarchappl) permissions for this schema.CREATE DATABASE archappl; GRANT ALL ON archappl.* TO 'archappl'@localhost IDENTIFIED BY '<password>'; -
The archiver appliance ships with DDL, for MySQL, this is a file called
archappl_mysql.sqlthat is included as part of themgmtWAR file. Execute this script in you newly created schema. Confirm that the tables have been created using aSHOW TABLEScommand. There should be at least these tablesPVTypeInfo- This table stores the archiving parameters for the PVsPVAliases- This table stores EPICS alias mappingsExternalDataServers- This table stores information about external data servers.ArchivePVRequests- This table stores archive requests that are still pending.
- Download and install the MySQL Connector/J jar file into your Tomcat's
libfolder. In addition to the log4j.properties file, you should have amysql-connector-java-XXX.jaras show here.[ lib ]$ ls -ltra ... -rw-r--r-- 1 mshankar cd 505 Nov 13 10:29 log4j.properties -rw-r--r-- 1 mshankar cd 1007505 Nov 13 10:29 mysql-connector-java-5.1.47-bin.jar -
Add a connection pool in Tomcat named
jdbc/archappl. You can use the Tomcat management UI or directly add an entry inconf/context.xmllike so
Of course, please do make changes appropriate to your installation. The only parameter that is fixed is the name of the pool and this needs to be<Resource name="jdbc/archappl" auth="Container" type="javax.sql.DataSource" factory="org.apache.tomcat.jdbc.pool.DataSourceFactory" username="archappl" password="XXXXXXX" testWhileIdle="true" testOnBorrow="true" testOnReturn="false" validationQuery="SELECT 1" validationInterval="30000" timeBetweenEvictionRunsMillis="30000" maxActive="10" minIdle="2" maxWait="10000" initialSize="2" removeAbandonedTimeout="60" removeAbandoned="true" logAbandoned="true" minEvictableIdleTimeMillis="30000" jmxEnabled="true" driverClassName="com.mysql.jdbc.Driver" url="jdbc:mysql://localhost:3306/archappl" />jdbc/archappl. All other parameters are left to your discretion.- Note for Debian/Ubuntu users: The Tomcat packages shipped with Debian/Ubuntu do not include the Tomcat JDBC Connection Pool. Download it from the web and drop the
tomcat-jdbc.jarfile into/usr/share/tomcat7/lib.
- Note for Debian/Ubuntu users: The Tomcat packages shipped with Debian/Ubuntu do not include the Tomcat JDBC Connection Pool. Download it from the web and drop the
Setting up storage
This is specific to the needs of yourpolicies.py.
However, if you are using the default policies.py that ships with the box or a variant thereof, you'll need to set up three stages of storage.
A useful way to do this is to create a folder called /arch and then create soft links in this folder to the actual physical location.
For example,
[ arch ]$ ls -ltra
total 32
lrwxrwxrwx    1 archappl archappl      8 Jun 21  2013 sts -> /dev/shm
lrwxrwxrwx    1 archappl archappl      4 Jun 21  2013 mts -> data
lrwxrwxrwx    1 archappl archappl     40 Feb 12  2014 lts -> /nfs/site/archappl/archappl01
drwxr-xr-x 195 archappl archappl 4096 Oct 15 15:05 data/arch.
For example,
export ARCHAPPL_SHORT_TERM_FOLDER=/arch/sts/ArchiverStore
export ARCHAPPL_MEDIUM_TERM_FOLDER=/arch/mts/ArchiverStore
export ARCHAPPL_LONG_TERM_FOLDER=/arch/lts/ArchiverStore
Create individual Tomcat containers for each of the web apps
Themgmt.war file contains a script deployMultipleTomcats.py in the install folder that will use the information in the appliances.xml file and the identity of this appliance to generate individual Tomcat containers from a single Tomcat install (identified by the environment variable TOMCAT_HOME).
To run this script, set the following environment variables
TOMCAT_HOME- This is the Tomcat installation that you prepared in the previous steps.ARCHAPPL_APPLIANCES- This points to theappliances.xmlthat you created in the previous steps.ARCHAPPL_MYIDENTITY- This is the identity of the current appliance, for exampleappliance0. If this is not set, the system will default to using the machine's hostname as determined by making a call toInetAddress.getLocalHost().getCanonicalHostName(). However, this makesARCHAPPL_MYIDENTITYa physical entity and not a logical entity; so, if you can, use a logical name for this entry. Note, this must match theidentityelement of this appliance as it is defined in theappliances.xml
deployMultipleTomcats.py script passing in one argument that identifies the parent folder of the individual Tomcat containers.
[ single_machine_install ]$ export TOMCAT_HOME=/arch/single_machine_install/tomcats/apache-tomcat-9.0.20
[ single_machine_install ]$ export ARCHAPPL_APPLIANCES=/arch/single_machine_install/sample_appliances.xml
[ single_machine_install ]$ export ARCHAPPL_MYIDENTITY=appliance0
[ single_machine_install ]$ ./install_scripts/deployMultipleTomcats.py /arch/single_machine_install/tomcats
Using
	tomcat installation at /arch/single_machine_install/tomcats/apache-tomcat-9.0.20
	to generate deployments for appliance appliance0
	using configuration info from /arch/single_machine_install/sample_appliances.xml
	into folder /arch/single_machine_install/tomcats
The start/stop port is the standard Tomcat start/stop port. Changing it to something else random - 16000
The stop/start ports for the new instance will being at  16001
Generating tomcat folder for  mgmt  in location /arch/single_machine_install/tomcats/mgmt
Commenting connector with protocol  AJP/1.3 . If you do need this connector, you should un-comment this.
Generating tomcat folder for  engine  in location /arch/single_machine_install/tomcats/engine
Commenting connector with protocol  AJP/1.3 . If you do need this connector, you should un-comment this.
Generating tomcat folder for  etl  in location /arch/single_machine_install/tomcats/etl
Commenting connector with protocol  AJP/1.3 . If you do need this connector, you should un-comment this.
Generating tomcat folder for  retrieval  in location /arch/single_machine_install/tomcats/retrieval
Commenting connector with protocol  AJP/1.3 . If you do need this connector, you should un-comment this.
[ single_machine_install ]$ Deploy the WAR files onto their respective containers
Deploying/upgrading a WAR file in a Tomcat container is very easy. Each container has awebapps folder; all we have to do is to copy the (newer) WAR into this folder and Tomcat (should) will expand the WAR file and deploy the WAR file on startup.
The deployment/upgrade steps are
- Stop all four Tomcat containers.
- Remove the older WAR file and expanded WAR file from the
webappsfolder (if present). - Copy the newer WAR file into the
webappsfolder. - Optionally expand the WAR file after copying it over to the
webappsfolder- This lets you replace individual files in the expanded WAR file (for example, images, policies etc) giving you one more way to do site specific deployments.
- Start all four Tomcat containers.
DEPLOY_DIR is the parent folder of the individual Tomcat containers and WARSRC_DIR is the location where the WAR files are present, then the deploy steps (steps 2 and 3 in the list above) look something like
pushd ${DEPLOY_DIR}/mgmt/webapps && rm -rf mgmt*; cp ${WARSRC_DIR}/mgmt.war .; mkdir mgmt; cd mgmt; jar xf ../mgmt.war; popd;
pushd ${DEPLOY_DIR}/engine/webapps && rm -rf engine*; cp ${WARSRC_DIR}/engine.war .; mkdir engine; cd engine; jar xf ../engine.war; popd;
pushd ${DEPLOY_DIR}/etl/webapps && rm -rf etl*; cp ${WARSRC_DIR}/etl.war .; mkdir etl; cd etl; jar xf ../etl.war; popd;
pushd ${DEPLOY_DIR}/retrieval/webapps && rm -rf retrieval*; cp ${WARSRC_DIR}/retrieval.war .; mkdir retrieval; cd retrieval; jar xf ../retrieval.war; popd;
Stopping and starting the individual Tomcats
Running multiple Tomcats on a single machine using the same install requires two enviromnent variablesCATALINA_HOME- This is the install folder for Tomcat that is common to all Tomcat instances; in our case this is$TOMCAT_HOMECATALINA_BASE- This is the deploy folder for Tomcat that is specific to each Tomcat instance; in our case this is${DEPLOY_DIR}/mgmt${DEPLOY_DIR}/etl${DEPLOY_DIR}/engine${DEPLOY_DIR}/retrieval
function startTomcatAtLocation() {
    if [ -z "$1" ]; then echo "startTomcatAtLocation called without any arguments"; exit 1; fi
    export CATALINA_HOME=${TOMCAT_HOME}
    export CATALINA_BASE=$1
    echo "Starting tomcat at location ${CATALINA_BASE}"
    pushd ${CATALINA_BASE}/logs
    ${CATALINA_HOME}/bin/jsvc \
        -server \
        -cp ${CATALINA_HOME}/bin/bootstrap.jar:${CATALINA_HOME}/bin/tomcat-juli.jar \
        ${JAVA_OPTS} \
        -Dcatalina.base=${CATALINA_BASE} \
        -Dcatalina.home=${CATALINA_HOME} \
        -cwd ${CATALINA_BASE}/logs \
        -outfile ${CATALINA_BASE}/logs/catalina.out \
        -errfile ${CATALINA_BASE}/logs/catalina.err \
        -pidfile ${CATALINA_BASE}/pid \
        org.apache.catalina.startup.Bootstrap start
     popd
}

function stopTomcatAtLocation() {
    if [ -z "$1" ]; then echo "stopTomcatAtLocation called without any arguments"; exit 1; fi
    export CATALINA_HOME=${TOMCAT_HOME}
    export CATALINA_BASE=$1
    echo "Stopping tomcat at location ${CATALINA_BASE}"
    pushd ${CATALINA_BASE}/logs
    ${CATALINA_HOME}/bin/jsvc \
        -server \
        -cp ${CATALINA_HOME}/bin/bootstrap.jar:${CATALINA_HOME}/bin/tomcat-juli.jar \
        ${JAVA_OPTS} \
        -Dcatalina.base=${CATALINA_BASE} \
        -Dcatalina.home=${CATALINA_HOME} \
        -cwd ${CATALINA_BASE}/logs \
        -outfile ${CATALINA_BASE}/logs/catalina.out \
        -errfile ${CATALINA_BASE}/logs/catalina.err \
        -pidfile ${CATALINA_BASE}/pid \
        -stop \
        org.apache.catalina.startup.Bootstrap
     popd
}
and you'd invoke these using something like
stopTomcatAtLocation ${DEPLOY_DIR}/engine
stopTomcatAtLocation ${DEPLOY_DIR}/retrieval
stopTomcatAtLocation ${DEPLOY_DIR}/etl
stopTomcatAtLocation ${DEPLOY_DIR}/mgmt
and
startTomcatAtLocation ${DEPLOY_DIR}/mgmt
startTomcatAtLocation ${DEPLOY_DIR}/engine
startTomcatAtLocation ${DEPLOY_DIR}/etl
startTomcatAtLocation ${DEPLOY_DIR}/retrieval
Remember to set all the appropriate environment variables from the previous steps
JAVA_HOMETOMCAT_HOMEARCHAPPL_APPLIANCESARCHAPPL_MYIDENTITYARCHAPPL_SHORT_TERM_FOLDERor equivalentARCHAPPL_MEDIUM_TERM_FOLDERor equivalentARCHAPPL_LONG_TERM_FOLDERor equivalentJAVA_OPTS- This is the environment variable typically used by Tomcat to pass arguments to the VM. You can pass in appropriate arguments like soexport JAVA_OPTS="-XX:+UseG1GC -Xmx4G -Xms4G -ea"LD_LIBRARY_PATH- If you are using JCA, please make sure your LD_LIBRARY_PATH includes the paths to the JCA and EPICS base.so's.